This plug-in aids in adding consistent GRO reference citations to your Family Historian individuals. They can be added as an Event Note, or as a full citation, with the reference added to the ‘Where in’ field of the source citation, or the ‘Text from Source’ as desired. When used to add a citation, it is assumed that you either have three source records to represent the Birth/Marriage/Death indexes, or a single source representing all three. When you first run the plug-in, you will be prompted to provide this information:
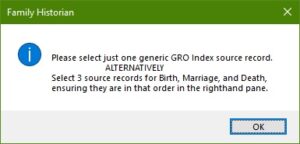
You will then be presented with a FH source selection dialog:

Here you should select the relevant GRO sources in the FH project. Note that you may need to re-order the selected source so that they are in the order Births, Marriages, Deaths otherwise the wrong source will be used for subsequent citations. You can decide not to add any GRO sources, and simply cancel the selection dialog, at which point you can Abort the plug-in or Ignore and proceed without any sources specified.
Once the information as been provided, or on subsequent runs, you will be presented with the main dialog of the plug-in as follows:
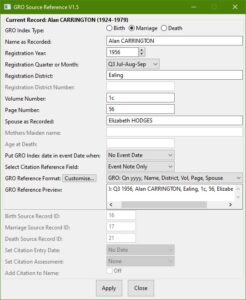
The fields displayed are pretty much self explanatory for those familiar with the GRO Indexes, but below there is an explanation for clarity of use of the plug-in. The plug-in is aware of the changes in GRO Index information since their start, and the following rules are implemented to change the UI as appropriate:
- Q3 1837 – Civil Registration in England and Wales begins.
- 1866 – GRO indexes include age at death.
- Q3 1911 – GRO Birth Indexes include Mothers Maiden Name, although the GRO have been adding this information to earlier entries when the can be determined.
- Q1 1912 – GRO Marriage Indexes include Spouses Surname.
- Q2 1969 – GRO Death Indexes show date of Birth instead of age at Death.
- Q2 1974 – GRO Volume Numbers re-organised (e.g. 9c became 32).
- Q1 1993 – Grouping of Districts into Volumes ceased for Births & Deaths, District/Register/Entry Numbers started.
- Q1 1994 – Grouping of Districts into Volumes ceased for Marriages, District/Register/Entry Numbers started.
At the top of the dialog it will show the currently selected individual with birth to death years as applicable for reference. If none is selected it will indicate ‘No record selected’.
- GRO Index Type: these radio buttons are used to select the type of registration that you wish to record.
- Name as Recorded: this field allows entry of the individuals name as it has been recorded by the GRO, this allows recording errors to be incorporated in the citation if desired.
- Registration Year: enter the year of registration, or use the spin arrows to increment/decrement. It will complain if you attempt to enter an invalid year value using FH date rules.
- Registration Quarter or Month: select the quarter or month as applicable to the registration you are recording. Generally the GRO indexes have been quarters until more recent times, when it gives a month of registration.
- Registration District: enter the name of the district the event was registered in. This will be used in the citation reference as is, but you will be prompted when you apply the citation to optionally provide a standard FH Place from your project that will be added to the event if none exists.
- Registration District Number: will be enabled when the Registration Year is post the 1992/3 reorganisation, and you can enter the register number.
- Volume Number/Register Number: the name will change depending on if the Registration Year is post the 1992/3 reorganisation to help remind the user of the change over. Enter the volume or register number as applicable to the citation.
- Page Number/Register Entry: similar to the above field, its name will change in tandem based on the year of the citation. Enter the volume or entry number as applicable.
- Spouse as Recorded: this field allows entry of the spouses name for a marriage as it has been recorded by the GRO, this allows recording errors to be incorporated in the citation if desired.
- Mothers Maiden name: will be enabled for birth registrations from Q3 1911, and you can enter the maiden name if available or another indicator such as ‘-‘ where it has not been recorded.
- Age at Death/Date of Birth: will only be enabled for death registrations, and the name will change depending on the Registration Year being Q2 1969 or later. Enter the age or DoB as applicable.
- Put GRO Index date in event Date when: this allows the selection of what to do with the citation year. You can select; ‘No Event Date’, in which case it will only update the event date if it is empty. ‘Year Only Event Date’, in which case it will only update the event date if it is just a year. ‘Inexact Event Date’, in which case it will only update the event date if it is not a full date, i.e. does not give the day. In all cases the Registration Year and Registration Quarter or Month will be combined to form a date to enter as a date for the event.
- Select Citation Reference Field: this allows the selection of where the citation reference should be put. You can select; ‘Where within’, in which case a citation will be created with the formatted GRO reference in the ‘Where within’ field of the citation. ‘Text From Source’ in which case a citation will be created with the formatted GRO reference in the ‘Text From Source’ of the citation. ‘Event Note Only’, in which case no citation is created, and the formatted GRO reference is added as an event note or prefixed to the existing note.
- GRO Reference Format: this is used to select from the available formats as to how you wish the GRO citation to appear in whichever location option you have selected in the above list.
- GRO Reference Preview: this field displays what the GRO reference will look like using the selection format and the data that has been entered in the preceding fields. It is a useful check to see you have not missed some inputs, or selected the wrong format. The field has not been made read-only as that deactivates scrolling in the event the selected format generates a long output and you would not be able to scroll it to check it. Any changes made in the field will be ignored and will not affect the citation generated.
Below the divider are fields that are only relevant when a source citation will be created i.e. you have not selected ‘Event Note Only’ as the Select Citation Reference Field. All the fields will all be disabled if ‘Event Note Only’ has been selected.
- Birth Source Record ID: this is the source record ID of the FH project that is the GRO Birth Indexes record. It will be filled in by the initial prompt process, but can be manually entered if that was cancelled and ignored.
- Marriage Source Record ID: this is the source record ID of the FH project that is the GRO Marriage Indexes record. It will be filled in by the initial prompt process, but can be manually entered if that was cancelled and ignored.
- Death Source Record ID: this is the source record ID of the FH project that is the GRO Death Indexes record. It will be filled in by the initial prompt process, but can be manually entered if that was cancelled and ignored.
- Citation Entry Date: you can select ‘No Date’ in which case no date is given to the citation, ‘Today’s Date’, in which case today’s date will be added to the citation, or ‘GRO Index Reg Date’, inn which case the Registration Year and Registration Quarter or Month will be combined to form a date that will be added to the citation.
- Set Citation Assessment: you can optionally select to add an assessment to the citation from ‘None’, ‘Unreliable’, ‘Questionable’, ‘Secondary Evidence’ or ‘Primary Evidence’.
- Add Citation to Name: if this option is selected, then a citation for the GRO Index will also be added to the individual for birth or death, or both spouses for a marriage.
The buttons at the bottom, complete the plug-in operation.
- Apply: this button performs the citation process and updates the FH project based on the information provided and the processing options selected. If an individual was not selected prior to running the plugin, you will be prompted to select one from a full list of FH individuals. Similarly, if it is a marriage citation you will be prompted to select the relevant FH family pair. Additionally{RNAME}, the currently selected options and format definitions as saved to the plug-in settings file found in the <FH project>.fh_data/Plugin Data folder.
- Close: this button ends the plug-in without making any changes to the FH project.
Clicking the Customise button next to GRO Reference Format activates the format management pop-up dialog, showing formats defined for the currently selected register type:
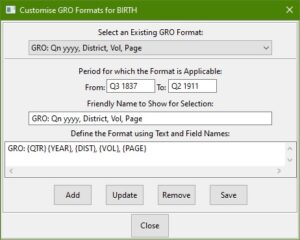
The drop-down at the top (below Select an Existing GRO Format:) is populated with any format definitions for the register type. You can select any you wish to view of edit here, and doing so will populate the fields below with the selected format information.
Period for which the Format is Applicable: has two fields below it:
- From: this is the date from which (inclusive) the format should be made available for selection in the main dialog. The date can be just a year, or where applicable a quarter and year (typically) or a month and year (not really a thing for GRO). These must conform to FH rules for a valid Date of these forms, also comparisons use the FH Date comparison API, and as such be aware that Q1 is considered to be before February or March etc. Read the FH API documentation for the Date object for additional information: https://www.family-historian.co.uk/help/fh7-plugins/hh_start.htm#api/objects/date/getdatept1.htm.
- To: this is the date up to which (inclusive) the format should be made available for selection in the main dialog. The same rules apply as for the From field.
Friendly Name to Show for Selection: the field below is the name that has been given to the selected format, and is arbitrary. The example above, and in the default formats provided are named to represent the typical output of that format, but you can give a format any name you prefer, or rename the built-in ones if wanted.
Define the Format using Text and Field Names: the field below shows the format definition. This comprises arbitrary text of your choosing combined with fields that will be replaced by corresponding values entered on the main dialog. If you wish to split the output over more than one line, simply use a return as normal to do a line break. There is no need to put in an escape such as ‘\n’ for a newline.
The available fields you can use are as follows:
- {RNAME}, the individuals name as recorded in the GRO index.
- {YEAR}, the year of registration.
- {QTR}, the quarter of registration.
- {MONTH}, the month of registration where applicable.
- {DIST}, the registration district name.
- {DISTNO}, the registration district number where applicable.
- {VOL} the volume number when applicable.
- {REG}, the register number when applicable.
- {PAGE}, the page number when applicable.
- {ENTRY}, the entry number when applicable.
- {RSPOUSE}, the spouses name for a marriage entry as recorded in the GRO index.
- {MAID}, the mother’s maiden name for births.
- {AGE}, Age at Death when applicable.
- {DOB}, Date of Birth for deaths when applicable.
The buttons below the divider are used to say what you want to happen to the selected format definition:
- Add: this button will add the entered information as a new format, it does not matter if the name is identical to an existing format, that’s your problem to figure out when selecting.
- Update: this button will replace the selected format with the information from the fields, so is used when renaming or changing the format.
- Remove: this button will delete the currently selected format. There is no confirmation pop-up, you have been warned.
- Save: this button forces a plug-in settings save in order to ensure the changes are saved for the next time the plug-in is run. If you do not use this, then it will rely on using the Apply button on the main dialog, which causes settings to be saved.
Finally, the Close button ends the pop-up and returns to the main dialog. This will also cause the formats to be re-loaded to ensure that any changes you made a available for use.
Plugin GRO Source Reference
Help content on this page is owned and provided by Chris Read, the plugin's author, Calico Pie takes no responsibility for its content.